mcp-what-why-how-demos
Model Context Protocol (MCP)は、大規模言語モデル(LLM)が外部ツールやAPI、データソースとシームレスに連携するためのオープンで標準化されたインターフェースです。MCPは、AIモデルの機能を拡張し、よりスマートでスケーラブルなシステムを実現するための一貫したアーキテクチャを提供します。これにより、カスタムコードの必要性や非標準APIの問題が解消され、ツールの追加が容易になります。
GitHubスター
2
ユーザー評価
未評価
お気に入り
0
閲覧数
35
フォーク
0
イシュー
0
Model-Context-Protocol: What, how and why
The Model Context Protocol (MCP) is an open, standardized interface that allows Large Language Models (LLMs) to interact
seamlessly with external tools, APIs, and data sources. It provides a consistent architecture to enhance AI model
functionality beyond their training data, enabling smarter, scalable, and more responsive AI systems.
MCP is an open protocol that standardizes how applications provide context to LLMs. Think of MCP like a USB-C port for
AI applications.
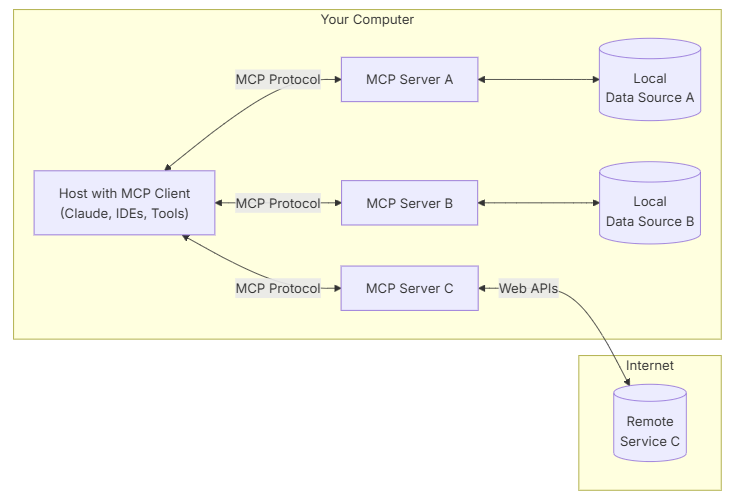
Figure 1: Picture from modelcontextprotocol.io
What is the problem MCP tries to solve
- Custom code per tool-model pair
- Non-standard APIs for each vendor
- Frequent breaks due to updates
- Poor scalability with more tools
Let us take a look at the Model Context Protocol and how it can be used
in practice.
Prerequisites
- PowerShell
installed - we do recommend an editor like Visual Studio Code to be able to write
scripts and work with code. - git installed - instructions step by step here
- .NET installed to run the application if you want to run it
- an editor (besides notepad) to see and work with code, yaml, scripts and more (for
example Visual Studio Code or Visual Studio
or Jetbrains Rider) - Azure CLI installed to work with Azure
resources - how to install - Docker installed to run the application in a container
if you want to run it in a container (or Podman, or any other container runtime) - [OPTIONAL] GitHub CLI installed to work with GitHub - how to install
- [OPTIONAL] Github GUI App for managing changes and work
on forked repo - [OPTIONAL] Windows Terminal
To work with the demos in this repository, you will need to have access to an Azure AI Foundry. You can get access
by applying by following
this getting started
tutorial and following the instructions to set up your
Azure environment. Once you have access, you will need to set up the environment variables for the demos to work.
Demo structure
- 1-AzureOpenAPICall - This demo shows how to call an Azure OpenAI model using the
Model Context Protocol. It demonstrates
how to set up the environment variables and make a simple call to the model. - 2-AgentWithBingTool - This demo shows how to use the Model Context
Protocol to create an agent that can interact with the Bing search tool. It demonstrates how to set up the agent and
make a call to the Bing tool using Azure AI Foundry and Bing connections. - 3-SimpleWeatherServiceMCPServer - This demo shows how to create a simple weather
service using the Model Context Protocol. It demonstrates how to set up the service and make a call to the weather
service using Azure AI Foundry. - 4-SimpleWeatherServiceClientCall - This demo shows how to call the
simple weather service created in the previous demo. It demonstrates how to set up the client and make a call to the
weather service using the Model Context Protocol. - 5-DeployToAcaHttpSupport - This demo shows how to deploy the simple
weather service to Azure Container Apps (ACA) with HTTP support. It demonstrates how to set up the deployment and make
a call to the deployed service using the Model Context Protocol. - 6-ServerWithAnotherMCP - This demo shows how to create a server that can interact with another
Model Context Protocol server. It demonstrates how to set up the server and make a call to the other server using the
Model Context Protocol.
Getting Started
To get started with the Model Context Protocol, you can follow these steps:
- Clone the repository:
git clone https://github.com/bovrhovn/mcp-what-why-how-demos.git
cd mcp-what-why-how-demos\src\MCPHWW
- set up the environment variables for the demo. You can do this by running the following PowerShell commands in your
terminal:
Set-EnvironmentVariable -Name "AI_FOUNDRY_PROJECT_ENDPOINT" -Value "<your-endpoint-to-the-azure-foundry>" -Scope Process
Set-EnvironmentVariable -Name "AZURE_OPENAI_ENDPOINT" -Value "<your-endpoint-to-the-deployed-model>" -Scope Process
## Bing connection id is in the format of /subscriptions/<subscription_id>/resourceGroups/<resource_group_name>/providers/Microsoft.CognitiveServices/accounts/<ai_service_name>/projects/<project_name>/connections/<connection_name>
Set-EnvironmentVariable -Name "BING_CONNECTION_ID" -Value "Bing connection id" -Scope Process
Set-EnvironmentVariable -Name "DEPLOYMENTNAME" -Value "<your-deploymentname>" -Scope Process
Set-EnvironmentVariable -Name "APIKEY" -Value "<your-api-key-from-model-deployed>" -Scope Process
Set-EnvironmentVariable -Name "SIMPLE_WEATHER_SERVER_PATH" -Value "<your csproj file path to simple weather service>" -Scope Process
- Run the demos (cd into which demo you want to run and then execute the following command):
dotnet run
Additional Resources
- Model Context Protocol Documentation
- MCP for beginners
- MCP C# SDK
- Best practices for access token in Microsoft Identity Platform
Trademarks
This project may contain trademarks or logos for projects, products, or services. Authorized use of Microsoft trademarks
or logos is subject to and must
follow Microsoft's Trademark & Brand Guidelines.
Use of Microsoft trademarks or logos in modified versions of this project must not cause confusion or imply Microsoft
sponsorship. Any use of third-party trademarks or logos are subject to those third-party's policies.